Saturday, December 27, 2014

An Envelope and Gift Bag

Hello friends!!
I'm back again sharing with you the very last post for this year and it's NOT a card. Hehehe :D Jokes apart, recently though, I had been asked by my cousin to create a very large gift bag approximately measuring 20 inches X 15 inches in size. She wanted to gift to her MIL and she wanted an exclusive envelope to go with it and this is what I came up with.
The sad part though, is that the pictures I clicked are from my phone camera and are not very good quality ones. So please bear with me!

The gift envelope :

 The gift bag! 

 A close up of the decorated panel :

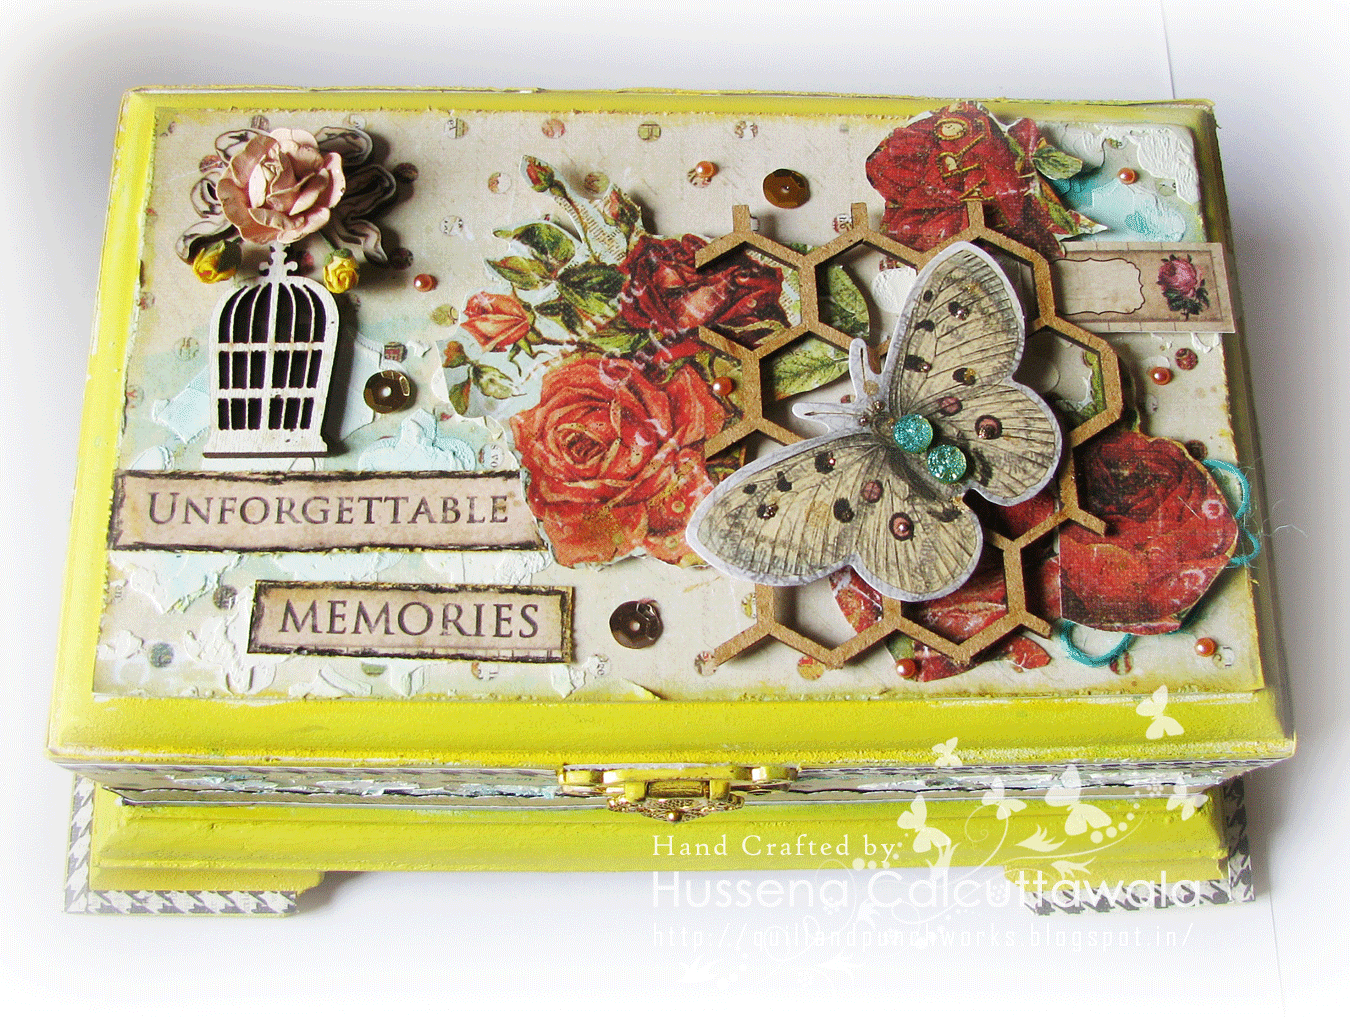
Since the gift bag was very large in size, the only thing I could think of creating was to create a panel for it which I did using cardstock and DCWV pattern paper. I have added punched laces using the Martha Stewart Doily Lace punch colored with Tim Holtz Distress Stains- Spun Sugar. The flowers and the leaves are created using Cheery Lynn Medium Tea Rose die. I'm totally in love with this die as this helps cut five different layers of flowers in one go plus it also cut and embosses the leaves, all in one go. This really saves time on die-cutting and plus the results are really beautiful. :-) I've used handmade paper to create my roses and leaves.

The gift envelope was embossed using Cuttlebug Swiss Dots embossing folder and added a Spellbinders die panel and again used the Cheery Lynn Tea Rose Medium die to make my flowers and foliage. The glittered alphabets are die-cut using glittered Washi tape and Memory Box Alphabet Soup die.

Supplies used :
Gift bag base- Local buy
Patterned paper- DCWV
Punches- Martha Stewart Doily lace.
Dies- Cheery Lynn Tea Rose Medium die, Spellbinders Radiant Rectangles die, Joy! Crafts Lily Angle Corner 2 die, Memory Box Alphabet Soup die.
Inks- Distress Stain - Spun Sugar.
Stamens , Fillers, Pink Glitter Washi tape, Pearls, Glitter Strips.

Envelope base- Handmade
Embossing folders- Cuttlebug Swiss Dots embossing folder, Sizzix embossing folder (RAK from Piali)
Dies- Cheery Lynn Tea Rose Medium die, Spellbinders Radiant Rectangles die, Memory Box Alphabet Soup die.
Punches - Martha Stewart Doily lace punch, Martha Stewart 3 in 1 Butterfly punch, Jef flower punch.
Pearls and glitter strips.

Challenges entered :
Cheery Lynn - Anything Goes

Hope you like my projects! I would love to hear what you think about them. :)
Have a nice day everyone!

Tuesday, December 2, 2014

You are awesome!

Hello everyone!
I am back again to share a shabby-chic card with you all. Love this style of card making and can't stay away from it for long. :P
Recently, I have been getting quite involved with the mixed media trend and I guess my card does incorporate a bit of Mixed media this time around! Here's a look at what I have created :

The base of my card has been made using three different patterned papers. The light pink striped pattern paper is from Graphic 45, followed by the blue one from Prima Marketing Cigar Box paper pad and finally the alpha one from Prima Marketing Coffee Break Paper pad.

The small butterflies were paper pieced from Prima Marketing Forever Green paper pad. For the base of my floral arrangement, I have used a Prima Marketing Doily Die #1 and popped it up on foam dots and colored with Distress ink- Tattered Rose.

 I have created a shabby-chic card so to create the look, I have distressed all the papers using a paper distressing tool and have inked all the edges of the papers with Distress ink- Tattered Rose. The flowers are all from my stash and I have Gesso-ed the edges of the flowers using Heidi Swapp Color Shine- Tropicana Teal Mist mixed with Gesso and painted using a paint brush to give that light blue colour to the flowers. The Gesso gives the flower a very nice texture and colour!

The sentiment has been stamped and paper-pieced and popped up on foam dots to give that raised look. I have used a lot of rhinestones on my card to add the bling factor to it. :D

Hope you all like it.

Supplies used :
Base cardstock- Campap and Fabriano Brustro.
Dies- Prima Marketing Doily Die #1.
Patterns papers - Graphic 45 (RAK from Piali), Prima Marketing A4 Cigar Box Secrets paper pad. Prima Marketing Forever Green 6 by 6 paper pad,  Prima Marketing Coffee Break Journaling Notecards - 4 X 6.
Flowers- Stash and few were RAK from Priya.
Stamps- Technique Tuesday Incredible stamp set.
Inks- Versafine Onyx Black ink pad, Distress ink- Tattered Rose.
Heidi Swapp Color Shine- Tropicana Teal Mist, Lindys Stamp Gang Hottie Pattotie Mists. (Used to colour the flowers).
Gesso, Rhinestones, Fillers, Mulberry Leaves.


Challenges entered :
Cardabilities - Sketch challenge ( Featured )

Have a nice day everyone!

Sunday, November 30, 2014

Gifting ideas !!

Hi friends,
I'm posting after a long time! Sorry about that but on the brighter side, I have a gift set to share today instead of a card. Yipee me :).. I had loads of fun creating this and my cousin quickly picked up this set for a upcoming wedding in the family so, I'm happy the way this turned out.

I'm sharing a kraft base gift bag with a matching tag! Here's a look at what I've created :
 The matching tag :

The set together:


To make this gift bag, I have used a kraft paper bag which was a local buy so I had a readymade base to work with but you can always create your own gift bags using Kraft paper.

The yellow pattern paper is from Pebbles Basic paper pad and I have layered die-cuts on it which I have coloured using Heidi Swapp Tropicana Teal Mist and Squeezed Lemonade Distress ink(I mean the bluish-green die-cut that you see on the bag). The flowers are handmade and were also colored using the same mist but I added loads of water and Distress Spray Stain- Picket Fence to lighten the colour. The leaves are also die-cut and colored using Crushed Olive and Shabby Shutters Distress ink. I've added few flower buds and foliage to complete my arrangement and also some tulle for added texture!
The border lace on the kraft bag is the Martha Stewart Doily Lace punch. I have colored my oval die-cuts on the bag and the tag using Heidi Swapp Gold Lame Mist to give the added shine!

The tag was made with the left-over paper from the bag and I've kept the arrangement same so that I could create a matching gift set.
You'll notice I have kept the sentiments very general on both my bag and tag so that this could be gifted for any ocassion be it for a birthday, wedding gift, marriage anniversary or any kind of celebration.

Supplies used :
Kraft bag- Local buy.
Pattern papers-  Paper Pad - 5.5'' x 8.5'' - Pebbles Basics.
Dies- Elizabeth Crafts Design 'Best Wishes' die, Cheery Lynn tea Rose Medium die, Spellbinders Floral Ovals die, Spellbinders Decorative Labels 8, Sizzix Sizzlits Die Set 3PK - Flowers, Branches & Leaves.
Stamps- Inspired by Stamping creative Tags stamp set.
Inks - Distress inks- Shabby Shutters, Crushed Olive and Squeezed lemonade, Versafine Onyx Black ink pad.
Heidi Swapp Tropicana Teal Mist, Martha Stewart Doily Lace punch, Viva Inka Gold, Tulle, Fillers and Pearls.

Challenges entered :
Really Reasonable Ribbon challenge -Gift packaging. (Made it to Top 3)
Crafty Sentiment designs- Use die cuts challenge
The Kraft journal-Use leftovers ( I have used leftover diecuts from other projects in my bag and tag).
( Winner! )
Have a nice day everyone!

Friday, November 14, 2014

Mr. & Mrs.

Hello everyone,
Today, I have another card to share with you all and I have created it for the Runway inspired challenge where we have to create a card based on the designer Oscar De La Renta's designs. He is a fabulous fashion designer and all his designed clothes are so gorgeous! Sadly though, he recently passed away. To honour his memory, the Runway challenge has asked us to choose from one of his Spring collection looks and create a card based on it. My card is inspired from the below picture :-

And here's my take on this inspiration :


Well as you can see, the first thing that attracted me to this look was the gorgeous lacy bottom half and I immediately had to recreate it ...At first my thought was to go for a die cut lace, but then I decided I wanted an stamped element on my card rather than a die cut one. I got out my  Justrite Floral fan Elements stamp set and picked out an border stamp from it and stamped and embossed it on vellum paper using Ranger Super Fine White Embossing powder and then fussy cut it and pleated the paper to create this look .
Then, I pulled out my Antique linen Distress Ink pad and smooshed it on my Craft Sheet and spritzed it with water liberally. I then ran my cream color cardstock in it. This gave a nice base color to my card and I went ahead and layered my embossed lace on the cardstock. On the upper half of the card,  I adhered a black card stock followed by a silver Washi tape. The frame is made from Mod Molds - Ornaments and painted using the Distress Spray Stain- Tarnished Brass and Platinum Stickles and I have adhered a Prima Zephyr paper on the back of it as I wanted to incorporate a little bit of the background from the inspiration picture in my card. I finished off my card with a die cut sentiment.
I'm also entering this card in the Pretty Paper Studio challenge where the theme this month is Embossing!

Here's a look at the stamp set I used for the lace :
 Hope this looong post has not put you to sleep :)

Supplies used :
Cardstock- Fabriano Elle Erre, Paper Accents- Vellum.
Dies- Memory Box Alphabet Soup die.
Stamps- JustRite Floral fan Elements stamp set.
Inks- Versamrk Dazzle Embossing ink pad, Distress ink- Antique Linen.
Ranger Super Fine White Embossing powder,  Prima Zephyr paper pad, Mod Molds - Ornaments, Distress Spray Stain- Tarnished Brass, Silver and Gold Glitter Washi tapes.

 I really hope you like my card ..Do drop in your comments about it ..Would love to hear from you regarding it :)
Have a nice day everyone!

Thursday, November 13, 2014

Welcome Baby !!

Hi friends,
So, I am back again to share my inspiration for this fortnight's challenge at Lulupu- Kids play.  I have gone with a new born baby card and kept my sentiment general so that this card would work both for a baby girl or a baby boy.

I have created a layered, embossed card on a kraft color base and used some pretty gold glitter tape to add that bit of shine to my project. The leaves are cut from that glitter tape. What I did was, I adhered the tape on a plain white cardstock and then ran it through my Big Shot with the leaf die. Worked like magic :D

A close-up of the flower clicked in natural daylight. Looks gorgeous in real life!

I have dry embossed the side panel of the card on the right side and sponged in white pigment ink over it to highlight the embossed design and on the left side, I have stuck a DCWV dotted pattern paper and die-cut the flower using watercolor paper and colored it with Peacock Feathers Distress ink by heavily spraying it with water. Even the side die-cut lace has been colored using Peacock Feathers Distress ink and I've created an ombre effect on the lace.
The baby pram is stamped, die-cut and the sentiment has been heat-embossed using Ranger Super Fine Gold embossing powder.

I'm entering this card in Virgina's View Challenge #9- Metallic. I have used gold embossing powder and glitter tape. Hope this qualifies!

Also, my card has been inspired by this time's Fusion challenge graphic picture. Love the ombre color.

Supplies used :
Kraft cardstock- Darice Core'dinations Collection.
Pattern paper- DCWV  Fresh Florals paper stack.
Embossing folder- Cuttlebug Textile folder.
Dies- PTI Filigree Border die, PTI Bloom Builder #3 die, Spellbinders Make a rose die (for the leaves), Spellbinders Shapeabilities Die D-Lites Frame 2.
Stamps- PTI Polka Dot Parade #4 stamp and die set.
Inks- Versafine Onyx Black, Colorbox Frost white pigment ink pad, Hero Arts Shadow ink- Tide pool, 
Distress inks- Peacock Feathers and Vintage Photo.
Versamark Dazzle embossing ink pad, Ranger Super Fine Gold embossing powder, Gold glitter tape.

Hope you like my card. Please do leave your comments regarding it. I love to hear from you :)

Monday, October 20, 2014

Sparkle with Prima Lulupu Blog Hop!

Hello everyone!
Welcome to the Lulupu Sparkle with Prima blog hop!
You should have come here from the very talented, Nikita's blog.
If not, here's a link to follow the complete hop list starting from the Lulupu blog.

Today is the Day 8 of the Blog hop and I hope you all have been enjoying all the gorgeous inspiration that the Lulupu team and the Guest Designers have been sharing up to now. We also hope you're hopping along each of the blogs and leaving us some love as they are lot of prizes to be won this month! Not only that, we have a month long challenge this month where we are asking you to use your Prima products to create a 'sparkly' project for this festive season. We not only are giving prize to to the Winner, but also to do the Top 3 this time. You really don't want to miss this opportunity :)

Now, coming to my project, I have an altered MDF box to share with a step-by-step tutorial. 


 The insides of the box which I have covered with a pattern paper from the Prima A4 Cigar Box paper pad.

Now, for the tutorial part :

Step 1- Paint the MDF box with White Gesso entirely. This will help in the paint coverage as Gesso gives tooth to your projects and so it takes colours very well.

 Step 2- Measure and cut the pattern papers you're going to use. I've used Prima A4 Cigar box paper collection entirely for my box right from the base paper to ALL the embellishments as well.
Distress your papers after cutting them either with a Distressing tool or with the help of a small pair of scissors and ink the edges using Distress inks of your choice. I have used Scattered Straw thought it is totally optional.

 Step 3- Before sticking the papers to your box, paint the box using paints of your choice. I have used Acrylic paints from Camlin- Chromium Yellow and Cobalt Blue.
Then, I have done stenciling using modelling paste from Sakura and a art knife and ofcourse a stencil of your choice.Mine is from My Favorite Things.

Step 4 - I've done stenciling on the top and all four sides. Then, added blue splatters using Heidi Swapp- Tropicana Teal mist and Heidi Swapp- Gold Lame mist. (This step is optional)

After these steps, I painted the insides of the box as well with Gesso and Blue paint and layered the Prima pattern paper inside as well. This is from the Prima Cigar Box paper pad too!
To embellish my box on the top, I've paper pieced the flowers from the Cigar Box paper pad again, mounted it on foam and adhered it to the top of the Honeycomb MDF piece.
The butterfly die-cut, the wooden cage and the bow are all from the Prima Epiphany collection- Wood icons and Ephemera pack.
I have used the Prima Coffee Break Crystals on the butterfly and also some gold sequins from the Epiphany Ephemera pack. The sentiment and the small tag n the right hand side are from a discontinued collection of Prima now, called Prima Romance Novel paper pad. I have liberally used Ranger Platinum Stickles on the butterfly and flowers though it does'nt seem to show in the photograph. :(

Hope you like my project. Do leave me your comments and views regarding it. 
You next stop on the hop is another incredible crafter, Mallika Kejriwal

Have a nice day everyone!

Thursday, October 9, 2014

Pattern Play -You are awesome

Hi friends,
In the series of my WCMD frenzy, here is another card I created based on Pattern play with Shay at the W & W blog. They are running a couple of challenges till Saturday for the WCMD. How fun is that ?
Here's a look at what I have created :
To make this card, I just played around with my Bo Bunny stamp set and my Hero Arts shadow inks.The stamp set  has a lot of geometric shapes and I was leaning more towards creating hexagons and arrows for my background but after trying out various combo's, I finally settled with the black stripes and triangles ..Actually, it was the feather die cut which clinched the deal for me :) It just sat so beautifully against all that stamped triangles ...But I have to confess, it was really hard for me to use this diecut. I have been hoarding it for like ages now  and now finally got a chance to use it ..Sigh !! A few sequins and pearls finished the card. On the bottom of the feather, I did some detailing using Platinum Stickles and I was all done.
Please do forgive my stamping Boo boo's. I am not very good with stamping yet and have quite a bit of shaky hands :( I seem to have messed up my bottom triangle !..Argh !!

View of the card while laying down :

Well that's it from my end ..Hope you like my card and do let me know your views. Would love to have your feed back regarding it.
Supplies used :
Cardstock- Fabriano Elle Erre.
Stamps- Winnie & Walter - The Big, Bold and You, Bo Bunny Stamps -To the Point.
Inks- Hero Arts Fresh Peach Mid-tone shadow ink, Hero Arts Tide Pool, Soft Blossom and Butter bar Shadow ink pads, Versafine Onyx Black ink pad.
Accessories- Feather die-cut, Ranger Platinum Stickles and Sequins.

Challenges entered :
Crafting when we can- No designer paper Made it to Top 3 )
Sentimental Sundays - Bling it up ( I have used stickles, gemstones on the feather and sequins) Winner!
Addicted to Stamps and More : Anything goes

Monday, October 6, 2014

Peach|Gold|Blush

Hello friends!
I am back again to share my second take for the WCMD challenge at Winnie and Walter. I told you, I was really excited about them, right ? :D
Here's a look at my card, first :
I've played along Gayatri's color combination challenge on W & W blog which was to use the color palette of using Peach, gold and blush. I really loved these colours but it was very challenging to create a card only with these colours. After a lot of false start, I decided to stamp and colour my flowers and leaves using a combination of Hero Arts Fresh Peach Mid-Tone Shadow ink and heat-embossing the leaves and the flower outline with Ranger Super Fine Gold Embossing powder. The background I have created using a stencil and Distress ink- Spun Sugar to give that blush touch to my card. 

Th sentiment is a combination of a die and sentiment stamp from Winnie and Walter. I die-cut the 'thanks' die-cut with gold glitter washi tape and it really sparkles in real life. Unfortunately, not able to capture it on camera. :( Those sequins you see scattered around were actually a gift from Winnie and Walter. :)

Supplies used :
Cardstock- Fabriano white cardstock.
Dies- Simon Says Stamp' Thanks' die
Stamps -Penny Black Petal Power stamp set, Winnie and Walter 'The Big, The Bold and You' stamp set.
Inks- Hero Arts Fresh Peach Mid-Tone Shadow ink, Distress Ink Spun Sugar, Versamark stamp pad.
Accessories- Heidi Swapp Polka Dots stencil, Ranger Super Fine Gold Embossing powder, Sequins, Gold glitter tape (Used for die-cutting).

Challenges entered :
Addicted to CAS -Stencil
Crafty Boots- Gold
House of Cards- Punches and Dies -I have used the 'Thanks' die from SSS.
Inspired by Stamping- Gold
Stamploration : stamping and Embossing

Thanks for dropping by! Hope you like my card. Would love to hear your views on it.

Sunday, October 5, 2014

World Card Making Day - Camera trend !

Hi Friends,
Wishing you all a very happy card making day. I know I am a day late but hey, it's  still 4th of October somewhere in the globe :)
My whole dashboard is filled with WCMD fun and exciting challenges and activities.and I just HAD to participate in a few of those challenges. :D
Winnie & Walter are hosting a set of six challenges which will run throughout the week and I have picked up the camera trend challenge hosted by the incredibly talented, Lea Lawson to play along.
Here's a look at my take on the challenge :

I found a totally fabulous tutorial on Pinterest on how to create a camera using the WRMK Envelope Punch Board and using the basic premise of that, I created this camera embellishment on my card. Then, using some Hero Arts Shadow Inks- Butter Bar and Soft Granite, I stamped the Pink Paislee Hello Sunshine camera from the set to create my border background. The sentiment is from Lawn Fawn Harolds ABC stamp set. I have used some Studio Calico Stars Wood Veneers which have been coated with some Platinum Stickles and some black thread to create the loop.

Supplies used :
Card base- Fabriano Elle Erre.
Pattern papers- My Minds Eye On the Bright side paper pad.
Stamps -Pink Paislee Hello Sunshine stamp and die set, Lawn Fawn Harolds ABC stamp set.
Inks- Versafine Onyx Black ink pad, Hero Arts Shadow Inks- Butter Bar and Soft Granite.
Punches- Various sizes of circle punches and 3 in 1 heart punch. These are all from a company called Jef.
Splatters are created using dark blue acrylic paint, Studio Calico Stars Wood Veneers.

Challenge entered :
Thats Crafty! Challenge blog -Keep it simple
The Crafter's Cafe -Uses punches/die cuts. I have used three different sizes of circle punches to make the camera and the hearts are punch outs too.
Little Red Wagon -In stitches ( I have used faux stitching) - Featured fave!
Fan-Tastic Tuesday- Use Camera/ Spotlighting- Made it to the Top 3 !

Well that's it from me ...Hope you like my card ..Do let me know your views regarding it :)
Have a nice day everyone !!

Tuesday, September 30, 2014

Coffee Lover's blog hop !!

Hello everyone! :)
Today, I am participating in a very fun blog hop called the Coffeee Lover's Blog Hop hosted by Chaitali of Cuts, Crops & Creativity. It's for all the coffee lover's out there as today is celebrated as National Coffee day!
I am an ardent fan of coffee and truly addicted to it. In India especially the southern part, coffee is a staple beverage and I have been born and brought there. So my love for coffee really originated from there. I love love love the South Indian Filter coffee, the aroma and the taste is something one just has to experience to appreciate it ..Truly !!

Okay besides my ramblings about coffeee there is a fun Q & A added to make this hop more fun and it goes like this :-
1. When did you start drinking coffee?? 
A. I guess at quite an young age probably as a teenager.

2. What is your favorite brand ?
A. I have two brands that I am crazy about one is from South India and its called BRU and the other is Nescafe.

3. What is the most amazing coffee that you had? Remember where and when? 
Like I have said already, my best memories of good coffee all originate from South India so it has to be filter coffee. :)

4. If I don't drink my needed coffee...
A. Well, my day is miserable and I turn completely morose and anti social :D

Ahh ! After this long post, here's a look at what I have created for this hop :

                       
My card is pretty simple!  I have used my very new Fiskars Latte Love stamp set to create  this card. For my background, the upper dots background is done with a Heidi Swapp stencil. I have sponged in Tumbled glass Distress ink through the dot stencil and for the lower part of my background, I stamped a gingham pattern using the Kaisercraft texture stamp using Hero Arts Fresh Peach Mid-tone shadow ink. The coffee cups ate stamped, colored and fussy cut then mounted on foam bits. The sentiment is stamped on a diecut which I have cut off from one side then colored a white cardstock using Fired brick Distress ink and punched them out using a small three in one heart punch.

To finish off my card, I have added a bit of  Platinum Stickles and Glossy accents to my steam and the hearts to make them pop.

Challenges entered :
  2. Simon Says Stamp Wednesday Challenge - Anything Goes!                                      
                          
Hope you like my card! Please let me know your views regarding it.
Have a nice day everyone!

Friday, September 19, 2014

Black, White plus one color!

HI friends,
I have a card to share today and I am really late in posting this on my blog. This card was created for our new challenge at the Lulupu blog where the theme is ..Yes, you guessed it. Black ,White and one color of your choice, so here's my take on the challenge theme. Have a look :


As you can see, I decided to go with yellow as my pop of color. I have done a layered card using an embossed background, paper and dies to create the whole look. I have tried to keep the embellishments to the minimum so as to make my three colors the hero of my card .The flowers and leaves on my card are die cut and just embossed using a stylus to give them dimension the small rose buds are also handmade using the same flower die which is the Joy! Crafts Floral flourishes (Flower 3).I have done dry embossing on my background using embossing folders and layered a die cut in the centre to frame my sentiment.I really went a little die crazy on this one :D.

Supplies used :
Cardstock - Yellow cardsotck is from The Craft Shop store, Black and White from stash.
Embossing folders - Provocraft Polka dots folder, Itsy Bitsy Flourishes folder.
Dies - Spellbinders Die-D-Lites Fancy Label Tags Four, Spellbinders Classic Scallop die set, Joy! Crafts Floral flourishes (Flower 3), Sizzix Leaves, Flowers and Branch die set.
Punches - Jef snowflake punch
Stamps- Hero Arts Find Joy stamp set, Inks- Versafine Onyx Black and Distress ink- Mustard Seed.
Black pearls.

Challenges entered :
Imaginations- Embossing
NBUS : #2 (I love to hoard dies and the Nbus I used on my card is the spellbinder's D lite die framing the sentiment and also the polks dot embossing folder )
Penny's Paper Crafty- Embossing
Cuttlebug Mania - Anything die-cut
Going grey with Scrap creations- Favorite embellishments (Flowers and Pearls)
The Pink Elephant- Embossing

Hope you'll like my card. Please do leave me your lovely comments. Would love to hear from you.
Have a nice weekend everyone!

Saturday, September 13, 2014

Textured, shabby tag !!

Hello everyone!
I've got two posts in two days. Yayy for me. :P
Okay, jokes apart, i have a tag to share today. My tag is totally inspired by all the gorgeous layered and textured tags that I keep seeing on Pinterest.  If you are a Pinterest addict like me, I'm sure you must have come across such tags which are loaded with details, yet they have a unique style of their own. Here I would like to mention that most of the Polish bloggers I've come across, do awesome work and my tag is a definite case of them! 


To make my tag, I have used on the base a very thick watercolor paper and layered it with a woodgrain background pattern paper. I have stenciled on one side using the Prima Damask stencil and texture paste, then smooshed my Distress inks on to an acrylic block and using a wet paint brush have painted the background randomly. The floral cluster on the left has it's base on first a piece of burlap whose edges I frayed, then created a frame using Spellbinders Floral Ovals die, made my flowers using punches this time, even the rose buds that you see are handmade by me using a small flower punch

This one I'm dying to share .. The small whitte resin frame you see is made using Mod Molds and a glue stick on which I've painted white using acrylic paint. I'm so loving the look of it !!

That's it from my side! 

Supplies used :
Pattern paper : DCWV, Prima Zephyr paper pad.
Punches : Jef six petal flower punch ( Large and small sizes).
Dies : Spellbinders Floral Ovals die, Impression Obsession Butterfly die set, Simon Says Stamp 'Be' stamp and die set.
Inks : Distress inks -Peacock feathers, Spiced Marmalade, Picked raspberry,Spun sugar and Wild honey.
Mold Molds Ornamental frames mold., White pollens, small pink pearls, light cream mulberry flowers and seam binding ribbon.

Challenges entered :
BGC -Textured tags - Made it to Top 3 !
SSS - Stamptember challenge ( I have used the 'Be' stamp and die set )
Polkadoodles- Tag, you're it.
We Do Doobadoo -Something feminine - Made it to Top 3 

Hope you all like my tag. I'm not very sure about this one so would love to know your views on it. Do drop me a line and have a nice weekend everyone :)

Friday, September 12, 2014

Mini Magazine holder with folders !

Hi friends,
Today, I have a mini magazine holder to share. There are lot of different versions of these magazine holders/ card holders all over the internet and, I have followed a tutorial from one such source from HERE. Here's a look at the way I have embellished my magazine holder once the base was made :


 This is the magazine holder :

I created a few folders with pockets so that I could store all my small dies in it. The base of the  folders are recycled from cereal boxes to give it a sturdy base. 


To make these folders, I cut apart a cereal box and used the central panel of the box to make my folder by scoring it in the middle and folding it like a card base. Check the picture below :

I have decorated the magazine holder with DCWV Fresh Florals pattern paper stack, assorted Washi tapes and my handmade flowers using dies.

Supplies used :
Pattern papersDCWV Fresh Florals pattern paper stack, K &Company papers.
Dies : Cheery Lynn French Pastry doliy die, Cheery Lynn Olive branches die, Cheery Lynn Embellishment #3 die, Spellbinders Rose Creations die, Spellbinders Floral Flourishes die, Memory Box/ Simon Says Hexagons die.
Punches : Punch Bunch 3 in 1 Hydrangea punch, Martha Stewart 3 in 1 Butterfly punch.
Kaisercraft Butterflies stamp set.
Inks : Distress inks - Worn Lipstick, Shabby Shutters, Vintage Photo, Peacock Feathers, Versafine Onyx Black ink pad.
Washi tapes, Modelling paste, Retro flower punch, Lindy's Stamp Gang Curiouser Chartreuse Flat Fabio mist.

Challenges entered :
Cheery Lynn - All about texture
Imaginations- Embossing ( I have used modelling paste on my first  folder and have done dry embossing on my flowers)
City Crafter Challenges- Butterflies ( I have added them on my file holders )
Craft Room - Something old, something new ( I have used my new SSS Hexagons die and the Cheery Lynn doily die, old is pattern papers which I've been hoarding and also my Washi tapes which are atleast 2 years old. ) ( Made it to Top 3 )
We Do Dobadoo - Something feminine ( I created this holder for my crafty desk ).

Hope you all like my project. Do leave me your comments. Would love to hear from you.
Have a nice day everyone.

Sunday, August 31, 2014

You make me happy !

Hi friends!
I have two cards to share with you today. The first one I've made is specifically for the Imaginations Challenge. This is an absolute last minute entry. :P I recently got the new Pink Paislee Hello Sunshine stamp and die set from Lulupu and had been dying to use it but I was just not finding time during the week to create anything so this weekend, all I did was craft. :D

Here's a look at the card. ... I've clicked the photographs in two different backgrounds and couldn't decide which one I liked best, so I'm sharing both the versions here.


The first umbrella card came together er very quickly as I knew exactly what I wanted to make here. I've used a red dotted pattern paper which was a RAK from Piali ( whose generosity I will never forget. . . Thanks a lot, Piali ) and the cloud and the rain drops are stamped.

Supplies used :
White Cardstock.
Pattern paper- RAK from Piali.
Hero Arts Tide Pool ink and Distress ink- Broken China, Versafine Onyx Black ink pad.
Heart punch, Ironworks Motif Circle die.

Challenges entered :
Imaginations Anything goes with Monsoon. ( Made it to Top 3 )
Daring cardmakers :Clean and simple
Crafts for eternity - Tic tac toe( I have used the the middle row:Use a punch (the tiny hearts are punched),The color blue,Use die cuts (the umbrella is a die cut ) ( Made it to Top 3 )

My second card is a continuation of my watercolor fascination  that I had shared earlier, consider it my TAKE TWO :)

With this card too, I knew exactly what I wanted to do but at the end of it I think if I could, I would really like to change my sentiment banner but unfortunately, it's hand-stitched to the card panel and I couldn't remove it without damaging the card panel. For the background, I've first distressed certain areas of the card using Tumbled Glass, Broken China and Peacock Feathers Distress inks, then I placed the MFT Moroccan Tiles stencil on it and sprayed it with plain water and let it dry, then I spattered some drops from Heidi Swapp Colour Shine Teal and Gold Lame . LOVE them! I also used the Lindy's Stamp Gang Hottie Patottie Starburst spray and after it dried, I stamped the butterfly trail using a Inkadinkadoo stamp set. The butterfly has been clear embossed and heat set, coloured and fussy cut and is from the Lawn Fawn Flutter by stamp set.

Supplies used :
White and black cardstock.
Lawn Fawn Flutter By stamp set.
MFT Moroccan Tiles Stencil 
Heidi Swapp Colour Shine Teal and Gold Lame mists, Lindy's Stamp Gang Hottie Patottie Starburst spray and  Dylusions Teal spray.
Distress inks- Tumbled Glass, Broken China and Peacock Feathers, Versafine Onyx Black ink pad.
Studio Calico Wood Veneers- Stars.

Challenges entered :
BGC -Watercolors.
AAA CAS cards -Watercoloring
Keep it simple - Ombre
Moving along with times :Faux or real stitching.

ETA - A blogger friend and fellow crafter, Sujana at Crafting for Passion blog is hosting a blog candy, would love it if you would drop by her blog and be part of it. :)

Hope you all like my cards. Would love to know your views on both my takes, so please do drop me a line. :)