Wednesday, December 19, 2018

Spellbinders December 19th Blog Hop

Hello, friends!
I'm so excited to be a part of the Spellbinders December Blog Hop today. I have THREE projects to share using several dies from the Exquisite Splendor Collection by Marisa Job.

You should have arrived from Desiree Kuemmerle's blog. Today, we are celebrating and featuring the following collections: 

Projects

First up, I have this card to share featuring the Square Medallion Tiles Dies. This is an absolutely gorgeous tile die set, and is simply versatile. There's so much one can do with this die set. Here's how I used it on my card:

This card was really simple to put together! I started by die-cutting the Square Medallion Tiles Dies from Neenah Classic Crest Solar White #110 LBS cardstock. Then, I coloured the die cut using three shades of Alcohol Markers by Altenew. This did not take much time at all, and was fairly simple to colour. 

Next, I matted the tile die cut on to some dark blue paper, and then gold foil cardstock. I also matted the centres of the die cut with gold foil cardstock to give it a more complete look. Finally, I stamped a sentiment directly on my card base, and it was done! :)


Next up, I have a Gift Box to share using the Square Medallion Tiles Dies and Blooming Floral Wreath Dies. I am sure most of you know by now, how much I adore making them! Here's one I created using these two die sets. 

I created the basic gift box using the Heart Flower Box Dies. This box die is simply amazing; I love it for the finish it gives, and the way it makes work so much more easier. :)

I used the Square Medallion Tiles Dies for creating the intricate background on the lid of the box. Next, I used the tiny flower dies from the Blooming Floral Wreath Die Set to create the floral cluster. I used three different sizes of the same flower die to create the flowers. I coloured them using Dye inks from Altenew and shaped them using embossing tools. I also added pollens to the centres to give the flowers a complete look. 

Here's a close-up of the flowers. I have tried to achieve an ombre effect on them!

The leaves were die cut using the wreath die from the Blooming Floral Wreath Die Set. I snipped off the leaves from the wreath, and inked the leaves using two different green dye inks to create the perfect foliage for my box. I love how this one came together. What do you think?

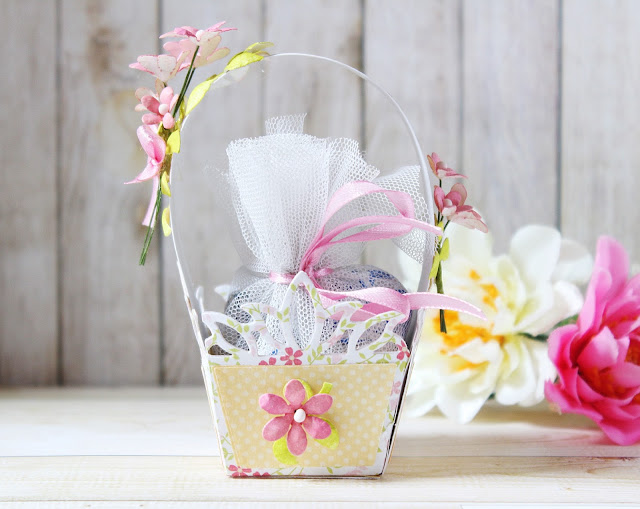
Lastly, I have a Gift Basket to share, which I made using the Tulip Flower Box Etched Dies. This is such an adorable die set for creating gift baskets. Here's a look at the one I have created:

This gift basket again took no time to put together. I started by die cutting the main square base die from White cardstock. Once my base was die cut, I went ahead and die cut the tulip box sides and the tulip box side inserts. Once everything was assembled, I die cut the coordinating inserts from patterned papers. This die is fairly easy to use and so well thought of, with the base dies and the insert dies combined together perfectly. The big plus point about this set is that, you can add as many layers or as many sides as you wish to, to create the basket of your choice.I have created a four sided basket, but a hexagonal basket is just as easy to create using this die.

I used the flower dies from the Blooming Floral Wreath Die Set to create tiny little clusters on either side of the handle. I die cut the flowers from White cardstock, inked them, and then adhered them in bunches on the handle.

I did the same thing on the other side of the gift basket. I made a slightly smaller bunch on this side to give the basket a balanced look.

The leaves are from the Blooming Floral Wreath Die Set. I inked them in green to go along with the mini flowers. I have added a bunch of chocolates inside the basket to show you how many chocolates can be fit in one small basket like mine. I hoe you like the idea. :)

Giveaway:
To celebrate this release, Spellbinders are giving away a $50 gift certificate to one blog reader – selected from the comments across all of the blogs in the hop. Giveaway closes on Sunday, December 23rd at 11:59 pm EDT. The winner will be announced on the Spellbinders Blog Hop post the following Monday. Winner is responsible for shipping cost, duties and taxes.

Blog Hop List:
Next, on the hop is Jennifer Snyder's blog. I have also included the full blog hop list so that you don't you get lost.

                         Hussena Calcuttawala (You are HERE)

Thank you so much for stopping by my blog. I would love to hear your views on my projects.
Have a great day!

Sunday, December 9, 2018

Altenew Crafty Friends Blog Hop | Winner Announcement

Hello everyone!

I'm here to announce the winner from the Altenew Crafty Friends Blog Hop. Thank you so much for leaving such wonderful comments on my post! I am so happy to know you liked my projects. :)


I used random.org for selecting the winner.


The lucky winner is 
.
.
.

Congratulations to you, Mugdha! Please e-mail Altenew at winner@altenew.com with the subject line Altenew Crafty Friends Blog Hop Winner from Hussena's blog to claim your certificate.

Thank you once again, everyone!

Friday, November 30, 2018

Altenew Crafty Friends Blog Hop Day 2 + Giveaway

Hello, friends!
I am really excited to be joining the Altenew Crafty Friends Blog Hop today. This hop celebrates the amazing friendships formed through our mutual love for paper crafting and more.

I have several projects to share today featuring many of my all time favourite Altenew stamps and more, and I hope you will enjoy seeing them. If you're here from the lovely, Sara Naumann's blog, then you're on the right track. You will also find the full blog hop list at the end of my post. 


I have been a part of the Blogger family for quite a few years now, and over a period of time, I have been inspired by many amazing crafters and their beautiful work. But the two main constants whose work always stands out for me is, Tasnim Ahmed's and Erum Tasneem's. And ironically, they both are a big part of Altenew as well. :) Both these crafters have such a unique style, and it's always a pleasure to see the new projects they have come up with. Erum's coloring is just out-of-the-world amazing, and Tasnim's work exudes such class and elegance. My cards for today's hop are totally inspired by these two talented crafting icons!

Most of you must be knowing that I am a BIG time floral enthusiast! I absolutely love incorporating flowers on every project I make. :D When I think of Altenew, the first thing that comes to my mind is their ever beautiful and elegant, floral layered stamps. I adore each and every stamp they make, and they are absolute must-haves for me!

I have made two cards for today's post, and you may notice, that both of them have a very similar design layout as well as similar colours. It so happened that after I finished making my first card, I had a few left over coloured flowers which I didn't want to go to waste. So, I decided to whip up another card in a very similar colour scheme. I would love to know which one you find better - the first or the second card?!

I have combined several of my favourite Altenew floral stamps on this card. I started by stamping the flowers from the Perfectly Perfect stamp set on Canson Montval Watercolor paper. I heat embossed the flowers in gold, and fussy cut them out. Next, I coloured them using the Zig Clean Colour Brush pens. 

After my flowers were coloured, I started working on my foliage. I stamped the leaves from the Build A Flower: Peony Blossom set using the Tropical Forest Mini dye inks. I also gold heat embossed and coloured some small flowers from the Amazing You stamp set. I love this set for all the little filler flowers it has! I used the same shades of Zigs that I used for colouring the bigger flowers. 

The sentiment comes from two different sets: I have combined the Perfectly Perfect stamp set and the Amazing You stamp set for creating my own sentiment. I wanted the card to have some more interest, so I adhered the Dotted Washi Tape on to White cardstock and punched out circles from it in several sizes to add to my card. No card is ever complete without some bling, so I also went ahead and adhered few gold sparkly sequins. That's it. This card was done!

ETA: I totally forgot to mention that my card was also inspired by this month's Altenew Inspiration Challenge colours. I loved the Christmas-sy colours and wanted to create a card using it.


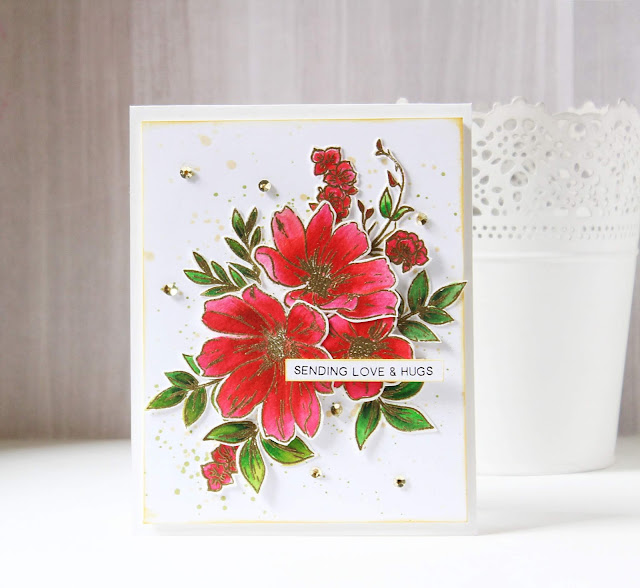
My second card features the same stamp. I have also coloured the flowers in a similar fashion as above. 

The flowers on this card are from the Perfectly Perfect stamp set and were stamped, gold heat embossed, coloured, and fussy cut. The leaves are also from the same set and have been created using the same method as the flowers. I used three different shades of green markers to colour the leaves. 

I added some additional foliage to my card panel using several stamps from the Blooming Bouquet stamp set. I tucked in the flowers in between some leaves as well as added some delicate foliage pieces to make the floral arrangement look more complete. 

To complete the card, I added a sentiment which is from the Adore You stamp set. This is one of my most used sentiment stamps, and you might have seen me use it in several cards before too. I love the font and the message! I also added some sparkly gold sequins and ochre paint splatters to finish my card. 


 Next up, I have a gift box and a coordinating gift tag to share. I love using my Altenew stamps for various projects other than cards too, and love the elegant look they give to any project!

First up, I have this gift box to share. I created the box using a gift box die. The finished box measures 5 1/4" x 3 5/8" x 7/8". I used the Painted Flowers stamp set to stamp the roses on the lid of the box using the Tea Party Mini Dye inks. The leaves are also a part of the same set. 

I stamped the flowers all over the lid to give it the look of a floral wallpaper! I love the unique colours of the Tea Party dye inks and think they look really pretty. Here's how the box looks when opened:

To embellish the box, I die cut an oval frame from the Create-A-Wreath Die Set. I popped up the frame using white foam. I also wanted to include a sentiment in the centre of the gift box and decided to go with one from the Sketchy Floral stamp set. I also added few die cut flower foliage from the Painted Flowers set to frame the sentiment. 


I also made a coordinating gift tag to go along with my box. 

I kept this tag fairly simple! I used the Painted Flowers stamp set to stamp the roses on either side of my tag. Then, I stamped the coordinating leaves to give the roses a more complete look. I used the Tea Party Mini Dye inks for stamping the flowers and the Tropical Forest Mini dye inks for the leaves. The sentiment is from the Sketchy Floral stamp set.

Special Offer
FREE U.S. shipping with code CRAFTY18 or $5 OFF international shipping with code FRIENDS18 at checkout. Offer valid from 11/29/2018 at 12:01 am EST through 12/1/2018 at 11:59 pm EST. Not valid on prior purchases. Cannot be combined with other promo codes.


Prizes
Altenew is giving away a $50 gift certificate to 5 lucky winners and one Altenew Academy class to 5 lucky winners. There are also 12 awesome friends who are celebrating with us, and they are offering the following prizes:

My Sweet Petunia: 3 MISTI stamping tools(Memory, Original, and Mini)
Jennifer McGuire Ink: Altenew $50 gift certificate & 10 handmade cards
Online Card Classes: 3 class spots
Create and Craft TV: £50 gift certificate
Ellen Hutson LLC: $30 gift certificate
Chameleon Art Products: 1 pack of 5 Chameleon Pens
Stamp & Scrapbook Expo: $25 gift certificate
Butterfly Reflections Ink: $25 gift certificate
Simon Says Stamp: $25 gift certificate
Scrapbook & Cards Today Magazine: 2 copies of Scrapbook & Cards Today Fall 2018 issue
Scrapbook.com: $25 gift certificate
Tombow USA: 1 pack of 10 Dual Brush Pens

Be sure to leave comments by Sunday, December 9th, 2018 for a chance to win! 37 winners will be chosen at random from the comments left on all of these blogs listed below and will be announced on the Altenew Card Blog and Altenew Scrapbook Blog on December 15th, 2018.

Additional Giveaway 
The generous folks at Altenew have allowed me to giveaway a $20 gift certificate to ony lucky person who leaves a comment on this post. If you would like to be considered for the giveaway, please leave a comment by 12/8/2018. I will announce the winner on 12/09 on my blog.

Blog Hop Order: 
I'm the last stop on this hop! If you're starting the hop from my blog, then your next stop will be the Altenew Scrapbook Blog.

                         Hussena Calcuttawala  (You are HERE!)


I hope you liked all my projects. I am really thrilled and thankful to have been asked to be a part of such an amazing blog hop! I would love to know if you have any favourite(s). Thank you so much for stopping by!

Saturday, November 3, 2018

Guest Post using CrafTreat Stencils | Part Two


Hello everyone!
I am back to share some projects I made using the amazing stencils from CrafTreat's September 2018 Release. I am in love with their layered florals and amazing background stencils. So much variety to work with here! I have a total of SIX projects to share today, so let's dive right into it!


I have used the Tropical Leaves stencil for my first card. This is such a fun stencil and is so versatile to work with!


To create this card, I began by die cutting a scalloped circle frame from Neenah Classic Crest Solar White cardstock. Once the frame was die cut, I used two inks from Altenew's Tropical Forest Mini Dye inks to color the background using the Tropical Leaves stencil.


Next, I stamped, coloured, and fussy cut some animals and placed them on my card base where I had cut out the circle frame. I also fussy cut some leaves and popped them on foam dots to add some dimension to my card. I added a stamped and die cut sentiment to finish off my card.


Card Two - CrafTreat Stencils - 2 Step Peony & Tropical Leaves


I love combining my craft supplies to give them a new look and that's what I did for this card as well. I used two stencils - 2 Step Peony & Tropical Leaves to create this card. 


The peonies were coloured using Altenew's Rose Petal inks. I coloured, fussy cut them, and placed them on my light blue ink blended background to create the focal for my card. I used the Tropical Leaves stencil for creating the leaves on my card. I coloured them using Altenew's Tropical Forest Mini Dye inks and then fussy cut them to place on my card panel. 


I also added a mix of some Altenew filler flowers (from the Beautiful Day stamp set) to give a fuller look to the arrangement. I added a piece of black and white patterned paper on the bottom of my card which is from Papericious' Monochrome paper pack. Finally, I stamped a sentiment on my card panel and that's about it! I love how this card came together!


Next up, I am sharing a set of two bookmarks I made using the CrafTreat Stencil - Lily and Iris.

I really loved how these turned out! They make for such pretty gifts to be given to any bookworm! To create these bookmarks, I used the Lily and Iris stencil with the Tombow Colorless Blending Pen and dye inks to stencil the designs on the bookmarks. I used a colorless blending pen here so that it would add a soft look to the design. If you don't have dye inks in your stash, you can work with Distress inks as well. Distress inks are very vibrant in nature, but when used with a colorless blending pen give you very beautiful results.


I used Altenew's Shades of Purple Mini Dye inks + Distress ink - Twisted Citron + Tombow Colorless Blending Pen to create the bookmark on the left, while I used Distress inks: Peacock Feathers & Twisted Citron + Tombow Colorless Blending Pen to create the bookmark on the right. I wanted to leave them as is, but then decided to add some black paint splatters and a stamped sentiment to complete the look. 


Lastly, I have two money envelopes to share I made using stencils. These stencils can be used to create a lot of interesting designs on the background of envies. Here's how I used them!

Money Envelope One - CrafTreat Stencils - Leaf Pattern Background & 2 Step Peony.

I have to admit, this envelope isn't one of my favourites, because I ended up making a major mistake in the background. I wanted the coral flowers to have a grey backdrop, but unfortunately the grey ink I used turned out to be a dark grey which almost looks like black. But I still wanted to share it with you all to give you an idea on how to creatively stretch your stencils. I used the 2 Step Peony stencil to create the flowers on my envelope. I coloured and fussy cut them and placed it on a oval lace die cut. The background for the envelope was made using the Leaf Pattern Background stencil.


This is how the flap of the envelope looks. I extended the design to the back as well to give it a more finished look. The small rose bunch is made using the Mini Rose Background stencil.


This envelope is more of my usual style and I am happy with the way it turned out! I used Sakura Modelling Paste mixed with Papericious Rajni Chawla's - Crystal Clear Glitter to create a white sparkly paste, and used this paste with the Daisy Background stencil to create the background. Once it dried, I used Distress inks - Squeezed Lemonade and Spun Sugar to create a watercolour splash on the background.


Here's how the background looks. The Papericious Crystal Clear Glitter adds a subtle shimmer to the background.


And here's how the flap of this envelope looks. I followed the same method to create the background even here. Doesn't it look pretty? 


I hope you liked my projects and found them inspirational. If you liked them, please do leave a comment below. I would love to hear from you! If you have any queries regarding any of the products or techniques used on my prooejcts, please feel free to ask me.

Thank you so much for stopping by!

Wednesday, October 24, 2018

Guest Post using CrafTreat Stencils | Part One

Hello everyone!
I am so excited and honoured to be guesting on the CrafTreat blog. I have some cards to share I made using the amazing stencils from CrafTreat's September 2018 Release. I am in love with their layered florals and amazing background stencils. So much variety to work with here!

I am sharing FOUR cards today, so let's get started!


My first card features the 2 Step Peony stencil. I think this is my absolute favourite from this release! This card took me hardly any time to put together as all I needed to finish it was this stencil. I used Altenew's Rose Petal and Tropical Forest Mini Dye inks to colour the peonies and leaves. 


To complete the card, I stamped my sentiment in black on white cardstock and fussy cut the 'hello' and foam mounted it on my card panel. The sentiment stamps are from Altenew.


I also added a strip of black diagonal stripes which is from Papericious' Monochrome paper pack to finish off my card.


Card Two - CrafTreat Stencils - 2 Step Rose CornerLeaf Pattern Background

This card was a lot of fun to put together! I started by stenciling the Leaf Pattern Background on my card panel using Altenew Limestone ink. Once my panel was ready, I took another piece of Neenah Classic Crest Solar White cardstock and inked the floral design from the  2 Step Rose Corner stencil using Altenew's Tea Party and Tropical Forest inks.


Next, I taped the stencil in place and outlined the image using a Microfine Tip Black Marker and fussy cut the images individually. I separated the floral cluster into individual flowers, and repeated the same process for the flower buds and leaves.


I die cut an intricate white oval frame using Crafter's Companion's Ornate Mirror die, and arranged my florals on one corner of the frame. I adhered some images directly on the card panel while I popped some images using foam dots. All that was needed to complete this card were black ink splatters and clear sequins. I also added a die cut sentiment to finish off this card.


To create this card, I began with a 4 1/4" X 5 1/2" piece of Neenah Classic Crest Solar White cardstock. I used the 2 Step Daisy stencil to create the focal for my card. This is a 2 Step Stencil, however I have used only one layer for this card. I used Altenew's Pocketful of Sunshine Mini dye inks for colouring the daisies. Once my stenciling was done, I die cut the card panel using a scalloped frame die.


I used the Happy Cutaway from Winnie and Walter for the sentiment of my card. The Inlay Die Cutting technique is a great way to add interest to your design especially in CAS cards. The way to achieve this look is to simply die cut the sentiment die design from your card panel and then pop it up using foam. This highlights certain parts of the design bringing the focus to it.


I really liked the look this gave me.  Here's a close-up shot showing you the dimension.


I added few sequins and stamped the coordinating sentiment to complete the card. 


Card Four - CrafTreat Stencils - Mini Rose Background and Leaf Pattern Background 

This is my personal favourite from this lot! I love the elegance and softness of the Mini Rose Background design. I rarely create 'Get Well" cards and this would be perfect to give to someone who is healing from a surgery or a setback. I again used Neenah Classic Crest Solar White cardstock as my card panel. I first started by stenciling the Leaf Pattern Background using Altenew Limestone ink. Then, I used the Mini Rose Background to create the floral clusters on the background. I used the leaf background as a trellis and accordingly placed my floral clusters. I stenciled all three flowers in some places, and in some only the individual ones.  


This stencil is quite dainty and you will need to use very fine tip daubers or detail blending tools. If you don't have any of them, you can use earbuds to ink your stencils. The leaves in this stencil are really very tiny and you have to take care that the ink from the flowers doesn't seep into the leaves and vice versa. 


I kept the rest of the card design pretty simple. I die cut a circle from Vellum and topped it with another die cut circle from white cardstock. I lightly sponged small flowers on the white circle using the tiny flowers included in the Mini Rose Background stencil. I added a die cut sentiment and few enamel dots to complete this card. 


I hope you liked my cards and found them inspirational. These stencils are infinitely versatile and can be used for a wide range of projects. I will be back to share some more project ideas using them in my next post, so stay tuned! :)

Thank you so much for stopping by!